

I just wanted to collect my PLNs and all what I created and tried on the web. I have already my own blogs, glogs, wikis and my delicious page .... I can put them there. Oh! No. My mind thinks about something else that I saw 5 weeks ago, but I didn't care a lot about it. Carla Arena, our Digital Tools e-course's moderator, created one for us during EVO 2012 experience. It is Scoop.it. Let's know something about it.
Scoop.it!
Scoop.it is a curation tool that enables you to create magazines and newsletters. It can help you track a topic of your choice and interest.
As you see, you don't need anything to begin curating. You can be a magazine editor in 5 minutes. Other people can suggest related articles, news, experiences ... for you, follow and share your topics. Here is a screenshot of my first curated page collecting all my products:
As you see, you don't need anything to begin curating. You can be a magazine editor in 5 minutes. Other people can suggest related articles, news, experiences ... for you, follow and share your topics. Here is a screenshot of my first curated page collecting all my products:

Steps to create your curated page:
- Sign up to create a free account.
- Click "Create" a topic and complete the title, description, language, and key words.
- Click "Upload" to upload a photo for your topic, if you wish.
- Click "Go" to move to the next step.
- Here is a screenshot explaining these steps:

- In the second step, drag and drop the Scoop.it Button to your bookmark toolbar, then click "Next". Here is a screenshot of what you are going to do:

- In the third step, click Start Curating Button to start your magazine.
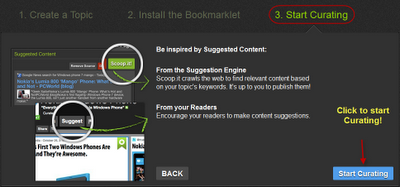
- By clicking the Start Curating Button, you have 4 options.
- The first option is to accept the posts suggested by the suggestion engine. On your Curate page, click on the green Scoop.it button at the top of each suggested content to add it to your topic.

- The second option is to click "New Post" and paste the URL in the blank field or click the button "Write a post without URL" as shown in the first screenshot below. Then, complete the title, description, upload an image and click post to add it in your curated page.
URL Option

Write a Post without URL Option

- The third option is to grab the content while navigating the web.When you are reading an article, website, a blog post or whatever is related to your topic, just click the "Scoop.it" Button on your bookmark toolbar. A window will open on your right of the page you are surfing. The title will automatically appear and you can write a description. If you don't like the image that appears with the content, you can upload your own by clicking "Upload your own Image". The screenshot below will clarify this option:

- The fourth option is to accept content suggested by other users. Other Scoop.it users, as well as visitors of your topics, can suggest content to your topics (by using the “Suggest” button in your topic tool bar – this button replaces the “New Post” button for visitors) or by using the bookmarklet themselves (the bookmarklet indeed allows to add content to your own topics or to suggest content to topics you follow). Content suggested by users will appear in your list of suggested content, on top of content suggested by the engine. You can decide to accept them by clicking on the green Scoop.it button or not (click on the red Discard button).
- By doing these steps, you can create your first magazine. Each curated includes some tools and features so you can work on it later. From left to right, you can force to top, edit, tag, delete, +1, react, share, and rescoop. Really, it is a very easy and interesting tool. It deserves a TRY!

Here are some videos that can help you to start Curating
Customization
Edit a Topic
Manage Sources
Sharing Options
Export Curation
Domain Hosting
Analytics
The question that arises now ... how to use such innovative tool in teaching?
Some ideas are:
- Students can collect their products throughout a project.
- Students can use it as an e-portfolio in which they can put their achievements, feedback, certificates, awards, ... during their school year.
- Students can read about some topics that the teacher specifies and write summaries for them. They can write a summary and insert an image with the title of each article.
- Teachers can use it a space where they can put the materials of their teaching.
Waiting for other suggestions from you to add them to this list!
No comments:
Post a Comment